This article is intended to describe how the amateur astronomer can start on spectroscopy, a topic often thought of as the province of the professional. I’m concentrating on low resolution spectroscopy here. The beauty of this subject is that plain ordinary stars – that the regular amateur astronomer isn’t usually interested in – become the main targets. Light pollution isn’t an issue either. And once you’re hooked you will want to chase after some pretty exotic objects that are nonetheless easy to observe and maybe eventually try a more specialist high resolution direction.
The simplest start is to buy a specialist grating – one that screws into the eyepiece tube using the standard thread present to take filters. In fact these gratings look just like standard astronomical filters for a 1¼” tube.
The one I use is by Rainbow Optics, an American company, though at the time of writing this article I couldn’t see a UK supplier for it. A similar grating is made by Paton Hawksley in the UK (Keynsham!) and is recommended by many amateurs. It currently retails for less than £90 but as long as you keep it clean it will never wear out!
It is possible to use the grating visually – the Rainbow Optics version came with a ‘cylindrical lens’ that smears out the narrow spectrum of a typical star laterally thus making it easier to see. But only bright stars (1st/2nd magnitude) show the details in their spectrum easily. It is advisable to move quickly onto the photographic course when far more stars and other objects are available.
You will need an SLR camera where you can remove the lens, and replace it with an adapter, one which will slide into the 1¼” eyepiece tube of your telescope and is threaded internally so you can screw the filter into it. So you are using the camera in ‘Prime Focus’ mode with a grating in the light path.

In these pictures of the setup I show the screw-in grating, camera and adapter attached to a small refractor eyepiece tube. However, I normally attach the setup to my 8” SCT telescope – the more light the better!
Find a bright star – Sirius, Vega, Altair (depending on the time of year) are good starters as they show good strong hydrogen lines. Centre it in the camera view finder. You will see one bright and one fainter spectrum either side of the star (the spectrum is ‘blazed’). So offset the star until it is close to the edge of the field of view and the bright spectrum is fully within it. It is often useful to have the star as a reference point in the field of view and subsequent photograph so as to help spectral line measurements later.
![]()
But as you get used to identifying features in the spectrum you may prefer to simply have the spectrum only in the field of view with no ‘dead space’ between the spectrum and star. The scale of the spectrum in your field of view can be adjusted by increasing or decreasing the distance between the grating and the camera CCD chip.
If you shoot the spectrum (a couple of seconds at 400-800ASA will do for a bright star but make sure the focus is sorted out at this point!) you will get a bright ‘rainbow’ streak of a spectrum. It is possible to process this ‘as-is’ later – with image processing software and/or simply rotating the spectrum so it is horizontal and then stretching it/resizing it laterally. By doing this you should see the details in the spectrum that you’re after – the dark (or light) spectral lines.
A better photographic option for brighter stars (say >6 mag.) is to smear the image out during the exposure. To do this adjust the grating so that the spectrum’s length is approximately perpendicular to the RA motion direction (this doesn’t have to be accurate); before you start the exposure either turn off your RA motor, or counter its action by using the RA fine speed adjustment control; start an exposure and let it run for 10-15 secs. You should then get a smeared out spectrum showing the spectral lines clearly (if they exist!). You can make the spectrum more symmetrical later, in an upright, less skewed form, by processing the image later.
![]()
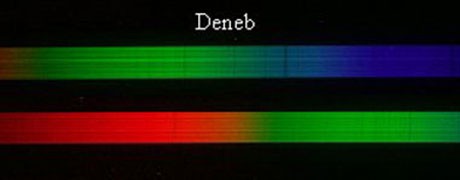
For interesting spectra, the bright stars (Sirius, Altair, Vega, Deneb) show strong H lines – other lines are more subtle:
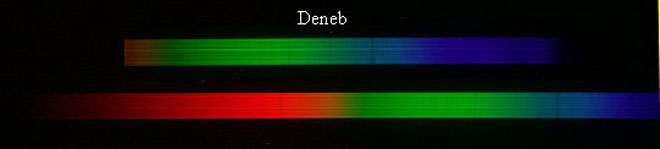
‘M’ type stars show a lot of detail, mainly due to molecules such as TiO in their atmospheres – good luck identifying them!
![]()
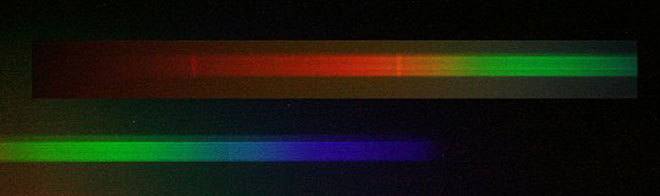
Many bright stars show varying patterns of dark absorption lines. However, there are some exceptions that show bright emission lines:
![]()
Note that the red hydrogen line above (α Balmer) is bright – an emission line apparently due to a hot gas disk around this unusual star. And more bright emission lines in β Lyrae:
A really interesting area concerns ‘Wolf-Rayet’ stars – extremely hot massive stars (100000C). There are few known but a whole group seems to be scattered in the Milky Way around Deneb. Tables of their RA and Dec positions are needed with a ‘GOTO scope in order to easily find them – none are brighter than about 7th Mag. In addition they are faint enough with my set-up to not be easily susceptible to the ‘smearing out’ technique (though I try sometimes). But the bright emission lines show up clearly in the narrow spectra, in contrast to adjacent ‘normal’ stars.

![]()
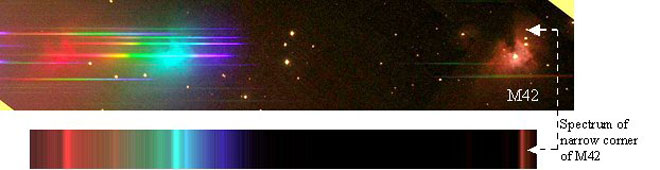
And don’t forget to try planetary nebulae, like M57, and other bright nebula like M42. Strictly speaking ‘extended objects’ like these show the most interpretable spectra when the light from the object is passed through a slit before reaching the grating but in this simple set-up interesting results can still be obtained:

Note that I’ve been flashy with lots of colour images (cos I like colour!) but many amateurs stick to intensity plots of the spectra – such as in the corner of one of my Wolf-Rayet spectra above. That after all does show the salient features.
For projects a popular subject seems to be the spectra of variable stars. Even the variability of the bright star Betelguese is unpredictable and the subject of ‘pro-am’ spectral observations.
Useful Links
http://astrosurf.com/buil/ – very active French astronomer at an advanced level
http://www.threehillsobservatory.co.uk/astro/spectroscopy.htm – tons of useful info here
IRIS – freeware image processing software is useful – general purpose but also with spectrum specific features
Visual Spec – a dedicated image processing program for spectroscopy (freeware) but can be tricky getting the input images in the right format to be accepted