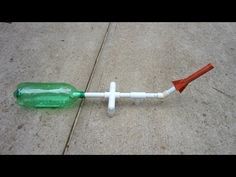

The simplest launcher for paper rockets constructed from A4 paper sheets rolled into tubes is the jump on bottle variety as shown on the right. They are reliable and fun as you need to jump on them for every launch. This can lead to a little wear and tear but swap over the 1.5 litre plastic bottle (air reservoir) and you are going again. The remainder of the parts can be picked up at your local DIY store.
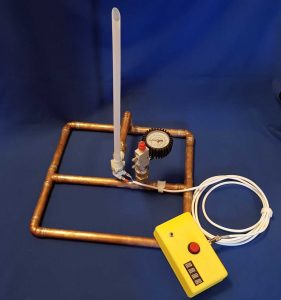
But what happens if you want something a little more engineered? Something that allows multiple launches without gymnastics and can lift heavier payloads into the firmament. Well you just need a pressurised air reservoir and a valve to release the air in a controlled way. This is why the device on the left was created. Using a car foot pump (or 12v electric pump) it can be charged up to 110 PSI (7.5Bar) and deliver up to 60 launches without replenishment. The parts were sourced from local firms and some UK online establishments so nothing exotic. It is designed with safety as the primary concern. No component is used more than 60% of its rated maximum and is hardened against misuse with the incorporation of an overpressure and valve. The launch tube selected is made of a semi-rigid plastic which will buckle easily if someone were to fall onto it.
The launch of the rocket is controlled by a commercially available 12v DC solenoid intended for water systems. Given the pressures behind this component, manually applying 12v DC will probably lead to a long pulse exhausting most of the air reserve. To overcome this and to be more fun for a younger audience, the pulse length is controlled by a micro controller (Pro Micro using AtMega 32u4) with an LCD display for countdowns and instructions. Instead a simple monostable circuit (NE555 chip) could be used to deliver a small single pulse. The only part that is not commercially available is the yellow control box I’ve used – again for the fun factor.
To build the launcher excluding controller you’ll need the following items:
| Part | Quantity | Cost | Source | Comments |
|---|---|---|---|---|
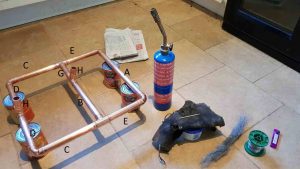
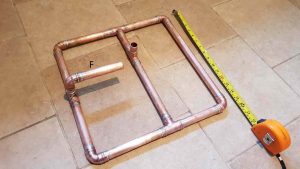
| 22mm Copper pipe | 2m | £11.99 | Screwfix | Cut to following lengths: A – 1 x 350mm B – 1 x 220mm C – 2 x 180mm D – 2 x 155mm E – 2 x 140mm F – 1 x 130mm G – 1 x 90mm H – 2 x 40mm |
| 22mm Equal Tee connector Yorkshire | 4 | £6.50 | Screwfix | |
| 22mm 90° Elbow connector Yorkshire | 5 | £6.70 | Screwfix | |
| 22mm compression to 3/4″ BSP F | 2 | £7.60 | Screwfix | |
| 3/4″ BSP M to 1/4″ BSP M | 1 | £3.70 | Ebay: context-pneumatic-supplies-cpm | 3/4″ to 1/4″ Bsp Male to Male Stainless Steel 316 Reducing Adapters |
| 2 port 1/4″ BSP 4 port 1/8″ BSP manifold | 1 | £5.99 | Ebay: context-pneumatic-supplies-cpm | Bsp Manifold 6 Hole 2 x 1/4 Bsp x 4 x 1/8 Bsp Double Sided Outlet Ports |
| 220PSI Gauge 1/8″ BSP | 1 | £4.99 | Ebay: ukkartstore | Car Kart Bike Tyre Pressure Gauge Head 220 PSI 1/8 BSP 28 TPI |
| Schrader 1/8″ BSP valve | 2 | £5.37 | Ebay: wowmartwowmart | 25mm 1/8″BSP Air Compressor Tanks Tusck Wheels Valve 500PSI For SCHRADER |
| 1/4″ BSP relief/overpressure valve 110 PSI | 1 | £2.95 | Ebay: sparcco88 | 1/4 BSP Brass Air Compressor Pressure Safety Release 10 BAR Relief Valve T134 |
| 1/8″ BSP Pressure switch NO 90-110PSI | 1 | £2.86 | Ebay: comyur | 90-110 PSI Heavy Duty Air Pressure Control Switch Train Horn Compressor 12V 3.5ACloses at 110 PSI. Opens at 90PSI. Used for auto filling |
| 3/4″ BSP M 12v Solenoid | 1 | £10.67 | Solenoid Valves (UK) Ltd | Solenoid Valve Nylon 3/4 to 10/12mm N/Closed 2/2 Way 0.2-10 Bar S90 – Port Size: 10.5 mm – Operating Voltage: 12v DC |
| Plastic Syphon | 1 | £1.98 | Mole Valley Farmers | Fixed tube used as launch pipe for rockets |
| MDPE liner | 1 | £0.24 | Mole Valley Farmers | To connect syphon tube to solenoid |
| PTFE tape | 1 | £0.54 | Screwfix | Used to seal threads |
stuff


The air reservoir is constructed using the 22mm copper pipe and connectors. Ordinary plumbing tools are required to create the joints; such joints are rated to 300PSI burst pressure. Rinse out the tubular construction to remove any unwanted flux or solder. The two compression to 3/4″ BSP fittings can be added to the open pipe ends using PTFE to ensure a good seal.
The Solenoid can be screwed into the horizontal launcher arm again using PTFE. It needs to be vertical which may only be achieved by loosening the compression joint and rotating after the solenoid is secured.
For the remaining 3/4″BSP opening, screw in the 3/4″ to 1/4″ adapter and the manifold block upon that using PTFE. Screw in the 1/8″ gauge and the pressure switch below it. On the opposite face add the two schrader valves. Finally screw the 1/4″ pressure safety valve into the top port.
Connect a car foot pump to one of the schrader and pressurise to 60PSI and leave to see if the air reservoir has any leaks. If it does then repair. Empty the reservoir using the safety valve to check its operation. Repressurise to 5PSI and then carefully apply 12v DC to the terminals of the solenoid.
Heat the end of the syphon tube in hot water and slide in the liner to the base. This will allow a snug fit between the tub and the solenoid. Construct a paper rocket and test the launcher out.
Controlling the Launcher
A 12v DC source can be created from an 8 AA battery pack and a NO relay. A long cable attached to the solenoid using car style spade connectors can have the other ends connected to one side of the relay output and the other to 12v DC. The other side of the relay output can be connected to Ground. A 5v DC pulse to the input of the relay will actuate the solenoid.
A simple monostable circuit using an IC like an NE555 to provide a pulse on a rising edge could be used to drive the relay. The pulse for a paper rocket should be in the region of 15 to 30 milliseconds.
In the design above, an AtMega32u4 is used to sense button pushes and control a 4 character segment display. On boot, instructions are scrolled across the display. A small button is used to Arm the system and commence the 10 second countdown that appears on the display. Once the count reaches 0, the large red button can be pressed to send the pulse to the relay (15 to 30ms). Pressing the red button too early or too late means the pulse will not be sent. The interface also allows the pulse length to be altered by those that know how so larger objects can be launched e.g. a rocket with an egg payload and landing system.

Hi
I am interested in producing a similar rocket launcher to the one shown here, for a school project, but would like some help with the control system you mention using the pro micro controller. Any advice / guidance you could will be gratefully received.
Thanks